
The Complete Guide to Water Softener Installation in Sandy, UT
Living in the beautiful Wasatch Front area offers incredible access to outdoor recreation, stunning mountain vistas, and a high quality of life. However, residents along the mountain benches face a shared, hidden household challenge that originates deep underground. This issue impacts your plumbing infrastructure, your appliances, and your daily comfort. Specifically, Sandy and the greater Salt Lake Valley feature some of the hardest water levels in the entire nation.
Consequently, to protect your home’s infrastructure and improve your quality of life, investing in a professional water softener installation sandy ut system is a vital property upgrade.
Many property owners do not realize the continuous damage that raw, untreated municipal water inflicts on their plumbing systems daily. Over time, heavy mineral deposits slowly choke your water lines, destroy water heaters prematurely, leave unsightly white film on dishes, and dry out your skin and hair. Therefore, installing a high-efficiency water conditioning system is not a luxury for local homes; it is a fundamental preservation step. This comprehensive guide explores the localized science behind our water supply, breaks down the core benefits of water softening, and outlines the precise installation playbook used by master plumbers to safeguard your property.

The Local Geology: Why Sandy, Utah Water is So Hard
To understand why a water softener installation sandy ut system is highly necessary, it helps to analyze the distinct geographic factors of the region. The water supply in Sandy originates primarily from mountain snowpack runoff that filters through the limestone-rich geological formations of the Wasatch Range. Additionally, the city utilizes deep groundwater wells managed by the Jordan Valley Water Conservancy District to supplement the local municipal supply.
As this water moves through the earth, it naturally dissolves and absorbs high concentrations of minerals. Specifically, it collects heavy amounts of calcium carbonate and magnesium ions.
Water hardness is typically measured in Grains per Gallon (GPG). According to data tracked by the United States Geological Survey (USGS), any water supply reading above 10.5 GPG is classified as “extremely hard.” In Sandy, municipal water tests routinely reveal hardness levels ranging from 12 to over 22 GPG, depending on the specific neighborhood zone and seasonal well blending. Consequently, this intense mineral density creates a harsh environment for your home’s appliances and plumbing components.
Quick Reference: Hard Water Impact vs. Softener Solutions
Before investing in a home water conditioning system, it is vital to understand the direct relationship between raw mineral problems and structural mechanical solutions. Review this technical matrix to evaluate how hard water damages your home and how professional filtration fixes it:
| Hard Water Symptom | Underlying Mechanism | Long-Term Hazard | Water Softener Fix |
| White Scale Buildup | Calcium and magnesium crystallize when water is heated. | Chokes pipe diameters; ruins water heater efficiency. | Ion exchange swaps hard minerals for harmless sodium ions. |
| Soap Scum Fillet | Hard minerals chemically bind with soap, preventing a lather. | Dulls shower glass; leaves a gray, sticky film on clothes. | Soft water blends perfectly with soaps to maximize suds. |
| Dry, Itchy Skin | Mineral crust traps natural oils and clogs skin pores. | Accelerates eczema; causes brittle, dry hair breakage. | Eliminates abrasive minerals, restoring skin hydration. |
| Etched, Cloudy Glass | Mineral scale bakes onto dishes during dry cycles. | Ruins glassware permanently with cloudy white spots. | Completely prevents mineral spot formation on dishes. |
The Compelling Benefits of Upgrading Your Water System
When you move forward with a professional water softener installation sandy ut project, the structural advantages extend far beyond just eliminating spots on your wine glasses. In fact, adding a high-efficiency water conditioner completely transforms your home’s operational budget.
First, your water heating appliances will experience an immediate boost in efficiency. When hard water enters a traditional water heater, the intense heat causes calcium to precipitate out of the liquid and settle at the bottom of the tank. Consequently, this creates a thick rock-solid mineral barrier between the burner and the water. As a result, the system must burn significantly more energy just to heat your water, spiking your monthly utility bills. Soft water completely eliminates this scale barrier, preserving your appliance’s lifespan.
Second, you will realize substantial savings on household cleaning supplies and detergents. Because hard water minerals actively neutralize the cleaning agents inside soaps, you are forced to use up to three times more laundry detergent, dish soap, and shampoo to achieve a clean lather. Therefore, switching to soft water allows you to cut your soap consumption drastically, saving your family hundreds of dollars annually while protecting the environment from excessive chemical runoff.
Step-by-Step Playbook: The Professional Installation Sequence
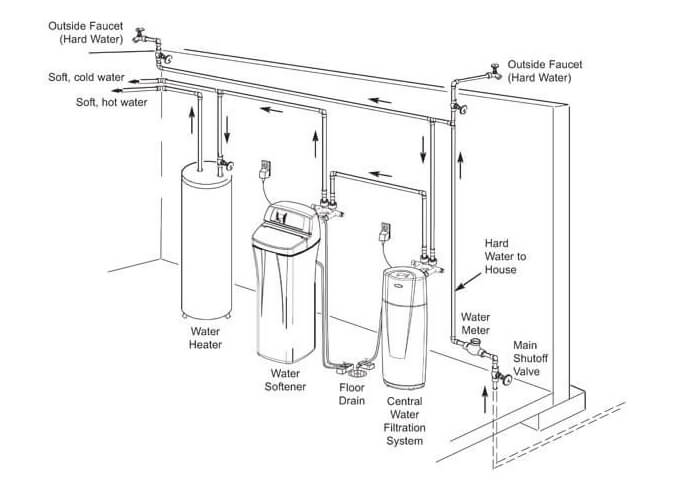
Safely integrating a modern water conditioning system into your home’s main water loop requires a precise, multi-stage plumbing approach. A single incorrect valve alignment or a faulty drain configuration can lead to dangerous pressure drops or accidental cross-contamination. Therefore, professional technicians follow a strict, structured installation protocol.
The Water Softener Setup Protocol
1.1. Test On-Site Water Hardness and Flow Rates:Water Testing.
Before selecting a system size, technicians test a live water sample from your property. This test measures your precise grains of hardness, iron presence, and total dissolved solids (TDS). Consequently, this data allows the team to program the digital control valve accurately, preventing premature regeneration cycles and saving salt.
2.2. Isolate the Main Water Line and Prep the Loop:Main Isolation.
Turn off the property’s main water shutoff valve completely and drain the home’s plumbing lines. Next, locate the ideal installation zone, which is typically in the basement or garage right next to the main incoming water line, ensuring the system sits upstream from your water heater but downstream from outdoor hose bibs.
3.3. Sweat Copper Pipe Connections and Install a Bypass:Structural Plumbing.
Cut into the main copper line and install a heavy-duty three-valve bypass manifold using premium lead-free solder or professional press fittings. This bypass system is incredibly important because it allows you to isolate the water softener for routine maintenance in the future without shutting off water to the entire house.
4.4. Connect the Backwash Drain Line with an Air Gap:Drain Setup.
Run a high-pressure drain line from the softener’s digital control valve to your floor drain or utility sink. Crucially, plumbers must maintain a physical two-inch air gap at the discharge point. This safety gap is legally mandated because it prevents black water or sewage from siphoning backward into your clean water system during a backup.
5.5. Initiate the Brine Refill and Hardness Programming:System Launch.
Fill the brine tank with premium pure salt pellets and add water to create a concentrated brine solution. Turn the main water valve back on slowly to pressurize the system, check every joint carefully for leaks, and program the digital control head with your precise local hardness settings to kick off the initial regeneration cycle.

Proactive Maintenance: Keeping Your Softener Running Strong
Once your water softener installation sandy ut project is complete, keeping the system operating at peak efficiency requires simple, routine maintenance. The most critical task is monitoring the salt level inside your brine tank once a month. Ensure the salt level stays at least a few inches above the water line, preventing the system from running out of brine solution during its automatic midnight regeneration cycles.
Furthermore, property owners should remain watchful for a common issue known as a “salt bridge.” A salt bridge occurs when high humidity causes the salt pellets to fuse together, creating a hard, hollow crust inside the tank. Consequently, while the tank looks completely full from the top, a hollow void exists underneath, preventing the salt from mixing with the water to create brine. To fix this, simply use a broom handle to gently break up the crusty layer, restoring normal system operation instantly.
According to residential water quality guidelines published by the Water Quality Association (WQA), scheduling an annual professional plumbing checkup ensures your system’s resin bed remains free of chemical fouling, keeping your water clean and your flow rates high for over fifteen years.